Bluesky is a popular microblogging platform built on the federated AT Protocol. You can host your own PDS and connect it to the Bluesky network.
The turnkey solution for running a PDS is the bluesky-social/pds repo on GitHub. It has an installer that guides you through setting up Docker (with docker-compose) on Ubuntu/Debian, likely on a VPS dedicated to running the PDS server.
For my personal infrastructure, I don’t use Ubuntu or Debian, nor do I use Docker: My PDS is installed on an Arch Linux machine with TLS terminated by nginx and certificates managed by certbot.
Setting up the service
So, let’s set up a node.js project for running the server – I tried to use Deno as the runtime initially, but there are native node extensions that
need to be loaded by some transitive dependencies. If you don’t have Node already, I recommend grabbing Volta and
running volta install node@lts.
$ npm init
$ npm install @atproto/pds express dotenv
$ npm install -D @types/express # optional: just for VS Code's IntelliSense
Then, we have a super simple index.mjs file adapted from
the service script in the pds repo:
import "dotenv/config" ;
import { envStr } from "@atproto/common" ;
import { PDS , envToCfg , envToSecrets , readEnv } from "@atproto/pds" ;
import pkg from "@atproto/pds/package.json" with { type : "json" };
import process from "node:process" ;
const main = async () => {
const env = readEnv ();
env . version ||= pkg . version ;
const cfg = envToCfg ( env );
const secrets = envToSecrets ( env );
const pds = await PDS . create ( cfg , secrets );
// hack: allow listening on non-0.0.0.0 addresses
const host = envStr ( "BIND_HOST" ) ?? "127.0.0.1" ;
const appListen = pds . app . listen ;
pds . app . listen = ( port ) => {
return appListen ( port , host );
};
await pds . start ();
process . on ( "SIGTERM" , async () => {
await pds . destroy ();
});
};
main (); The changes here are:
- We’ve switched out CommonJS imports for ESM
-
We use
dotenv/configto load environment variables from a.envfile, since we don’t have docker-compose defining things for us -
Since we’re not in a network namespace provided by Docker, we bind to
127.0.0.1so that an unnecessary HTTP port isn’t exposed to the internet. (We’ll reverse-proxy HTTPS via nginx later) - There’s no extra route needed since we’re not using Caddy’s on-demand TLS feature
Configuring the service
The required .env file for the PDS is pretty extensive, and you’ll need a few randomly-generated secrets. The normal installer gets
these via openssl rand --hex 16, which I recommend too. If you don’t have openssl you can
head -c 16 /dev/random | xxd -p instead, I guess.
PDS_HOSTNAME =pds.example.com # change me!
PDS_PORT =2583
PDS_DATA_DIRECTORY =/srv/www/pds/data
PDS_BLOBSTORE_DISK_LOCATION =/srv/www/pds/data/blocks
PDS_BLOB_UPLOAD_LIMIT =52428800
PDS_JWT_SECRET ="<secret 1>" # generate me!
PDS_ADMIN_PASSWORD ="<secret 2>" # generate me!
# this is a key that should be generated with an openssl command:
# openssl ecparam --name secp256k1 --genkey --noout --outform DER | tail -c +8 | head -c 32 | xxd -p -c 32
PDS_PLC_ROTATION_KEY_K256_PRIVATE_KEY_HEX ="<secret 3>"
# this config block connects your PDS to the Bluesky main net:
PDS_DID_PLC_URL ="https://plc.directory"
PDS_BSKY_APP_VIEW_URL ="https://api.pop1.bsky.app"
PDS_BSKY_APP_VIEW_DID ="did:web:api.bsky.app"
PDS_REPORT_SERVICE_URL ="https://mod.bsky.app"
PDS_REPORT_SERVICE_DID ="did:plc:ar7c4by46qjdydhdevvrndac"
PDS_CRAWLERS ="https://bsky.network"
LOG_ENABLED =trueConfiguring nginx
I’m pretty idiosyncratic when it comes to this: I have my own TypeScript DSL for generating nginx configs.
Since we want to provision TLS certificates via ACME http-01 (i.e. with certbot), we’ll need a plaintext HTTP endpoint that can respond to the
.well-known/acme-challenges. Let’s also redirect all other HTTP requests to HTTPS while we’re at it:
#!/usr/bin/env -S deno run
import ngx from "jsr:@char/ngx@0.1" ;
export const config = ngx ( "server" , [
"listen 80 default_server" ,
"listen [::]:80 default_server" ,
// redirect http to https:
ngx ( "location /" , [ "return 302 https://$host$request_uri" ]),
// serve acme challenges
ngx ( "location '/.well-known/acme-challenge'" , [ "root /srv/www/acme" ]),
]);
if ( import . meta. main ) console . log ( config . build ());
Your distro should already have an nginx config that includes everything from some folder, and this script (deno run ./default.ngx.ts)
spits out a regular site configuration file that can go in there.
Then, as long as /srv/www/acme exists and nginx is running, we can provision TLS certificates using certbot. So, let’s grab a cert for
our PDS domain:
$ certbot certonly --webroot -w /srv/www/acme -d "pds.example.com" Now we can get onto an nginx configuration for the PDS itself, which is a basic nginx reverse proxy plus some rigmarolery to get WebSockets to get through properly:
#!/usr/bin/env -S deno run
import ngx from "jsr@char/ngx@0.1" ;
const DOMAIN = "pds.example.com" ; // change me!
const server = ngx ( "server" , [
`server_name ${ DOMAIN } ` ,
...ngx . listen (),
...ngx . letsEncrypt ( DOMAIN ),
// allow large blobs to be uploaded:
"client_max_body_size 1G" ,
ngx ( "location /" , [
"proxy_pass http://127.0.0.1:2583" ,
// a little extra work to get WebSocket proxying working:
"proxy_http_version 1.1" ,
"proxy_set_header Upgrade $http_upgrade" ,
"proxy_set_header Connection $connection_upgrade" ,
// set the correct Host header for OAuth:
"proxy_set_header Host $host" ,
]),
]);
const httpUpgrade = ngx ( "map $http_upgrade $connection_upgrade" , [
"default upgrade" ,
"'' close" ,
]);
export const config = ngx ( "" , [ httpUpgrade , server ]);
if ( import . meta. main ) console . log ( config . build ());
As always, you can deno run this to get a config that you can place in http.d / sites-enabled. Then just
sudo systemctl reload nginx
Creating an account
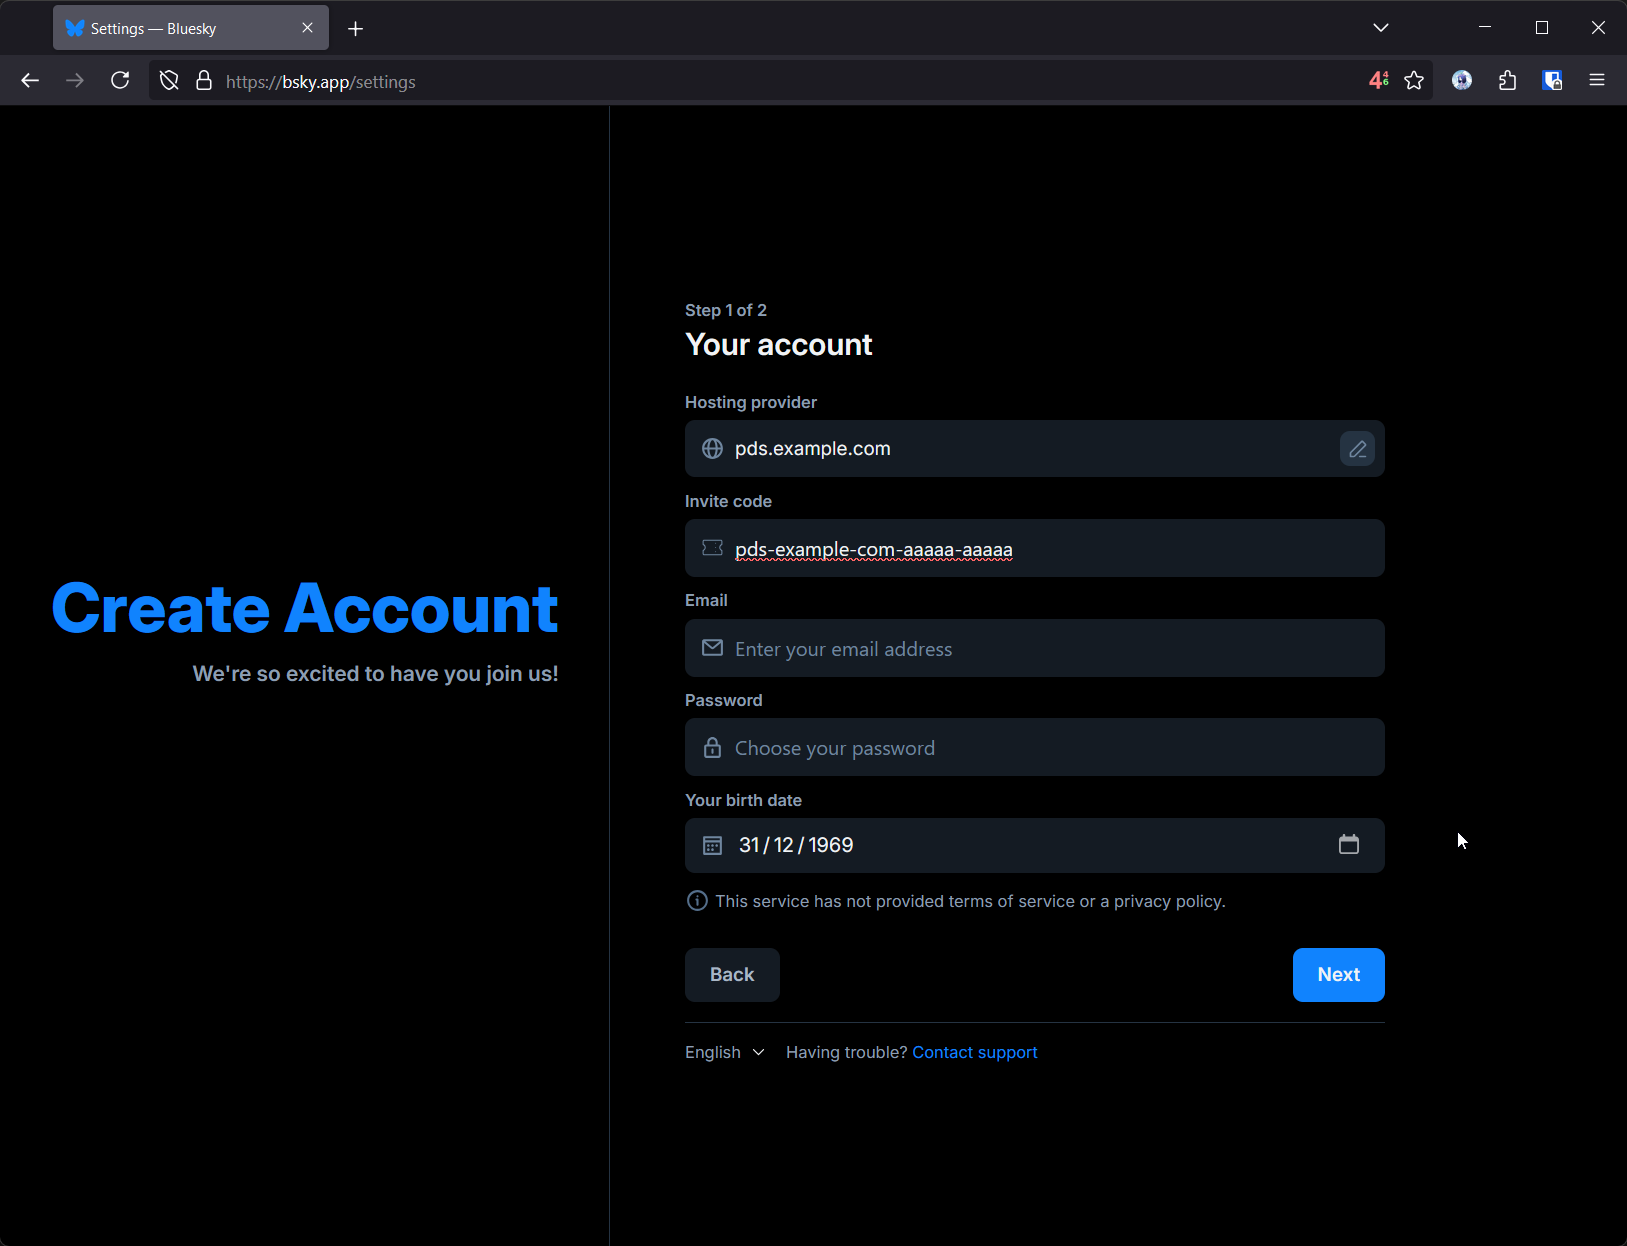
Okay, so you have a PDS running, but now you need to make an account. This is pretty simple via the bsky.app application, but to do so you’ll need to generate an invite code.
$ # make sure PDS_ADMIN_PASSWORD is exported!
$ curl --request POST \
--user "admin: ${ PDS_ADMIN_PASSWORD } " \
--header "Content-Type: application/json" \
--data '{"useCount": 1}' \
"https://pds.example.com/xrpc/com.atproto.server.createInviteCode"
pds-example-com-aaaaa-aaaaa Then you can just create a new account via the Bluesky web application, providing the PDS as a ‘Custom’ hosting provider:
Have fun!